How to Craft an Anvil on Minecraft Without Mistakes (Simple & Reliable Method)
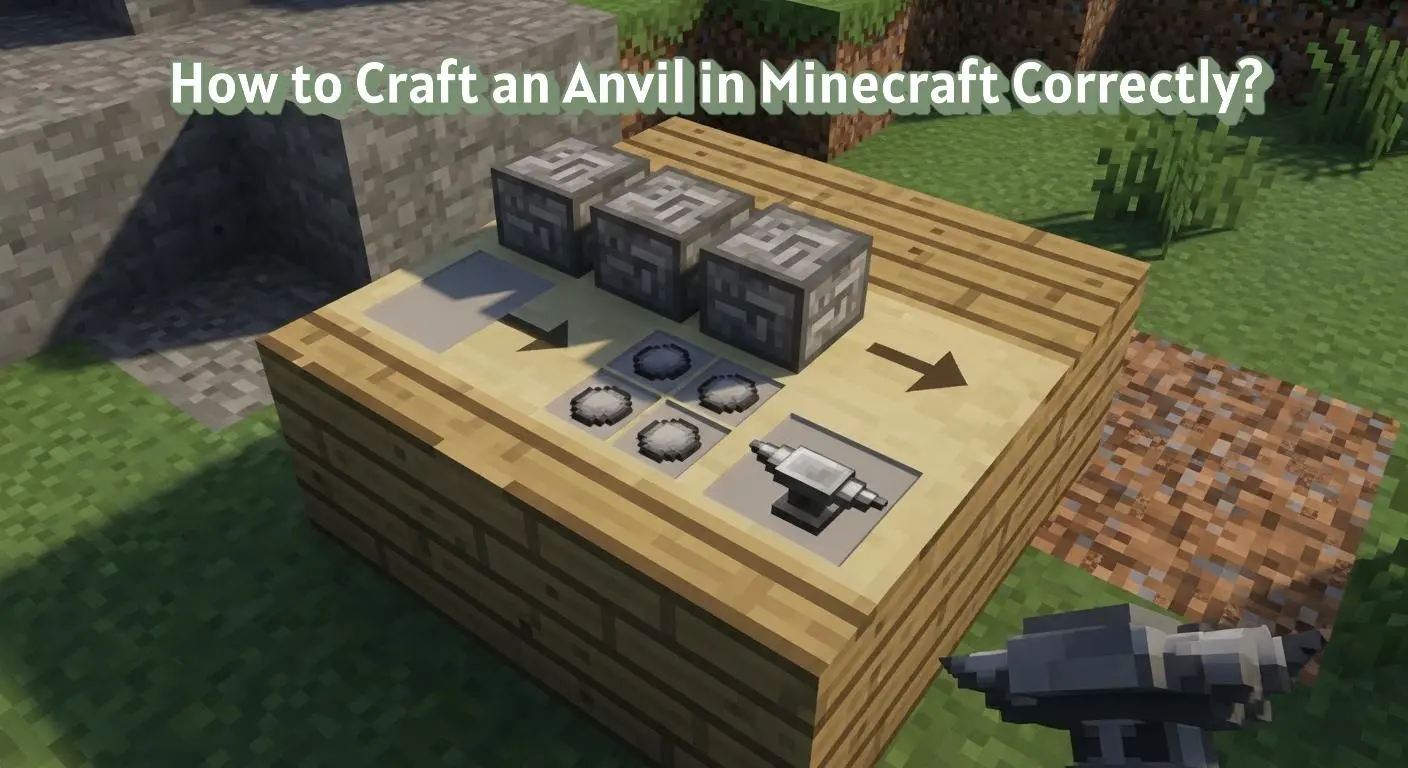
To learn how to craft an anvil in Minecraft, place three iron blocks in the top row, one iron ingot in the center slot, and three iron ingots in the bottom row of a crafting table. This crafting recipe produces one anvil, used to repair tools, combine enchantments, and rename items.
🟢 Anvil Crafting Recipe in Minecraft
The anvil crafting recipe in Minecraft uses iron blocks and iron ingots arranged in a crafting table. The correct placement produces an anvil used to repair tools, combine enchantments, and rename items.
| Item | Materials | Crafting Result |
|---|---|---|
| Anvil | 3 Iron Blocks + 4 Iron Ingots | 1 Anvil |
🟢 What Is an Anvil in Minecraft?
An anvil is a utility block used to repair, rename, and combine items in Minecraft. It is crafted using iron based materials and functions as a workstation rather than a decorative block.
Anvils allow players to manage tools, armor, and enchanted items. They are placed in the world and interacted with directly for item modification.
🟢 What Do You Need to Craft an Anvil in Minecraft?
Crafting an anvil in Minecraft requires collecting and preparing iron based materials before using the crafting table.
🟩 Required Materials for an Anvil
An anvil requires iron blocks and iron ingots. Iron blocks are crafted from iron ingots, which are obtained by smelting iron ore.
🟩 How Much Iron Is Needed to Craft an Anvil?
A total of thirty one iron ingots are required to craft one anvil. Twenty seven ingots are used to make three iron blocks, and four ingots are used directly in the recipe.
🟩 Crafting Grid Requirement
An anvil can only be crafted using a 3×3 crafting table grid. The recipe cannot be completed in the 2×2 inventory crafting grid.
🟢 How to Craft an Anvil in Minecraft?
Crafting an anvil uses a fixed recipe that combines iron blocks and iron ingots. The materials must be placed correctly in the crafting table grid.
🟩 Anvil Crafting Recipe
Place three iron blocks across the top row of the crafting table. Place one iron ingot in the center slot of the middle row and three iron ingots across the bottom row.
🟩 Using the Crafting Table Correctly
The anvil recipe requires the full 3×3 crafting table grid. All items must be placed in their exact positions for the anvil to appear in the result slot.
🟩 What Happens After Crafting an Anvil?
The crafted anvil appears in the output slot and can be moved to the inventory. The anvil item can then be placed on the ground like other utility blocks.
🟢 How to Get Iron for Crafting an Anvil in Minecraft?
Iron must be collected and processed before crafting an anvil. The process involves mining, smelting, and converting ingots into blocks.
🟩 Finding Iron Ore
Iron ore is found underground in stone layers. It appears as gray blocks with tan speckles and is commonly located in caves and mined tunnels.
🟩 Smelting Iron Ingots
Iron ore must be smelted in a furnace to produce iron ingots. A fuel source such as coal or charcoal is required for smelting.
🟩 Crafting Iron Blocks
Iron blocks are crafted by placing nine iron ingots into the crafting grid. Three iron blocks are needed for the anvil recipe.
🟢 What Can You Use an Anvil For in Minecraft?
An anvil is used to manage and modify items during gameplay. It supports several item related actions through a single interface.
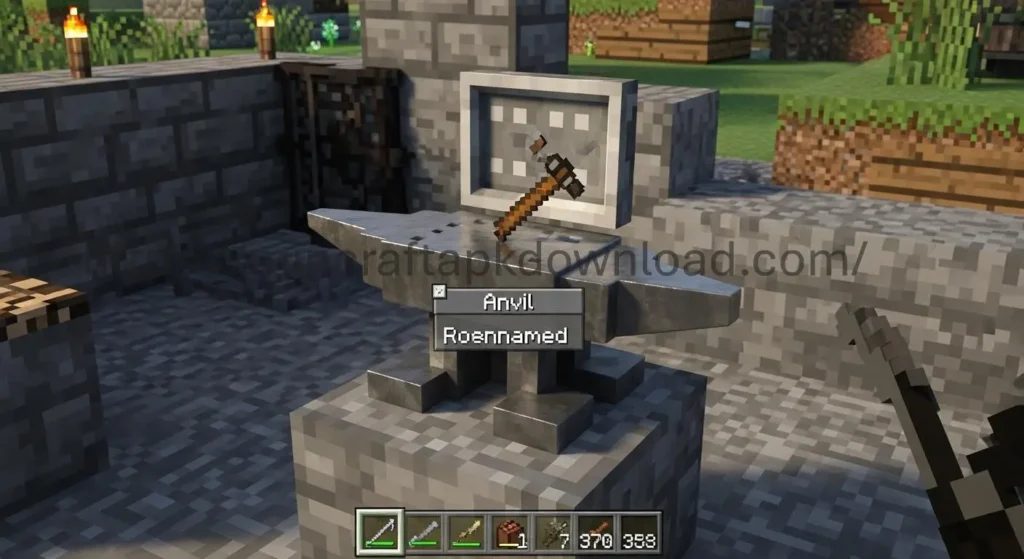
🟩 Repairing Tools and Armor
An anvil repairs damaged tools and armor by combining items or using materials. Repairing reduces durability loss compared to repeated crafting.
🟩 Renaming Items
An anvil allows items to be renamed using text input. The new name appears when the item is held or stored.
🟩 Combining Enchantments
An anvil allows players to combine enchanted items or books to merge enchantments. The process applies experience costs depending on the item and enchantment type. Players who want to understand this system in more detail can explore Minecraft enchantment mechanics.
🟢 Common Mistakes When Crafting an Anvil in Minecraft
Anvil crafting often fails due to incorrect materials or placement. These issues usually happen during preparation or setup.
🟩 Using Iron Ingots Instead of Iron Blocks
An anvil recipe requires iron blocks, not loose iron ingots. Placing ingots in the top row will not produce an anvil.
🟩 Incorrect Item Placement
Iron blocks and iron ingots must be placed in specific slots. Any deviation from the recipe layout prevents the anvil from appearing.
🟩 Missing Required Materials
Crafting fails if all required iron blocks or ingots are not present. Partial materials do not trigger the recipe.
🟢 Does Anvil Crafting Work the Same in All Minecraft Modes?
Anvil crafting follows consistent rules across game modes and platforms. Differences relate only to access and resource availability.
🟩 Anvil Crafting in Survival Mode
In Survival mode, all iron materials must be collected and crafted before making an anvil. The crafting table is required to complete the recipe.
🟩 Anvil Crafting in Creative Mode
In Creative mode, anvils are available directly from the inventory. Crafting rules and the recipe layout remain unchanged.
🟩 Platform and Version Consistency
Anvil crafting uses the same materials and recipe on Java Edition, Bedrock Edition, and console versions. Interface controls may vary by platform.
🟢 Why Is an Anvil Important in Minecraft Progression?
An anvil plays a key role in managing equipment as gameplay advances. It supports systems that extend the lifespan and usefulness of items.
🟩 Role in Gear Maintenance
Anvils are used to repair tools and armor instead of replacing them. This allows players to keep equipment functional for longer periods.
🟩 Support for Enchantment Progress
Anvils combine enchanted items and books. This enables stronger enchantments to be applied to weapons, tools, and armor.
🟩 Long Term Gameplay Value
Anvils remain useful throughout different stages of the game. They continue to support item upgrades and management as resources improve.
🟢 Anvil Damage States and Placement Behavior in Minecraft
Anvils change state over time and interact with gravity when placed. Understanding these behaviors helps manage anvils during regular use.
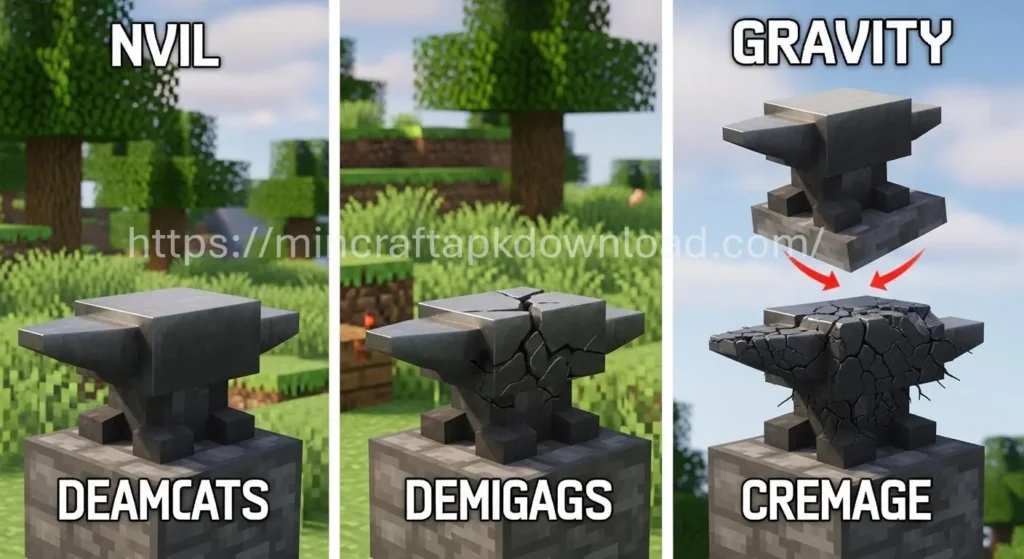
🟩 Anvil Damage States
Anvils have three states: undamaged, slightly damaged, and very damaged. Each use has a chance to move the anvil to the next damage state.
🟩 Anvil Gravity and Falling Behavior
Anvils are affected by gravity and fall when placed without support. A falling anvil can damage entities it lands on.
🟩 Placing and Moving Anvils
Anvils can be picked up and moved after placement. Breaking an anvil drops it as an item unless it breaks due to damage state.
🟢 Anvil Usage Limits and Costs in Minecraft
Anvils have built in limits related to experience cost and item combinations. These limits affect how often and how efficiently anvils can be used.
🟩 Experience Level Cost Limits
Each anvil operation consumes experience levels. Costs increase when items are repaired or combined multiple times.
🟩 Prior Work Penalty
Items gain a prior work penalty after each anvil use. This penalty raises the experience cost for future anvil actions.
🟩 Maximum Cost Restriction
Anvil actions become unavailable if the experience cost exceeds the allowed limit. The interface prevents the action when this limit is reached.
🟢 Anvil Storage and Handling in Minecraft
Proper storage and handling help maintain anvils and reduce accidental loss during gameplay.
🟩 Storing Anvils Safely
Anvils can be stored in chests like other blocks. They occupy one inventory slot and stack only as single items.
🟩 Safe Placement Locations
Anvils should be placed on solid blocks to prevent falling. Unsupported placement causes the anvil to drop due to gravity.
🟩 Moving Anvils Without Damage
Anvils can be broken and picked up using a pickaxe. Breaking an anvil drops it as an item unless it breaks due to its damage state.
🟢 Anvil Interaction Rules and Restrictions in Minecraft
Anvils follow specific interaction rules that affect how items are processed. These rules apply whenever an anvil is used.
🟩 Item Renaming Restrictions
Items can be renamed using an anvil with experience levels. Certain characters and formatting are not supported in item names.
🟩 Enchantment Compatibility Rules
Only compatible enchantments can be combined on an anvil. Incompatible enchantments will not merge into a single item.
🟩 Repair Material Limitations
Only valid materials can be used to repair items on an anvil. Incorrect materials will not apply to the repair slot.
🟢 Anvil Best Practices for Efficient Use in Minecraft
Using an anvil efficiently helps manage resources and experience levels. These practices focus on correct planning and item handling.
🟩 Plan Repairs Before Items Break
Repairing items before they reach very low durability reduces experience cost. Combining items earlier avoids higher penalties.
🟩 Combine Enchantments Strategically
Combining enchantments in the right order lowers experience usage. Testing combinations before final application helps control costs.
🟩 Keep Spare Anvils Available
Anvils can break after repeated use. Keeping extra iron ready allows quick replacement when an anvil becomes too damaged.
🟢 Troubleshooting Anvil Issues in Minecraft
Some anvil actions fail due to setup limits or game rules. These checks help identify common reasons an anvil does not work as expected.
🟩 Anvil Says “Too Expensive”
The anvil blocks actions when experience cost exceeds the allowed limit. This occurs after repeated repairs or combinations on the same item.
🟩 Item Will Not Combine
Items will not combine if enchantments are incompatible. The anvil interface prevents merging when rules are violated.
🟩 Repair Slot Does Not Accept Materials
The repair slot only accepts valid materials for the item type. Incorrect materials are rejected by the anvil interface.
🟢 Anvil vs Grindstone in Minecraft
Anvils and grindstones both interact with items but serve different purposes. Understanding the difference helps choose the correct block.
🟩 Function Differences
An anvil repairs items, renames them, and combines enchantments. A grindstone removes enchantments and repairs items without experience cost.
🟩 Experience Usage
An anvil consumes experience levels for most actions. A grindstone refunds some experience when enchantments are removed.
🟩 When to Use Each Block?
An anvil is used when enchantments need to be preserved or combined. A grindstone is used when enchantments need to be cleared or reset.
🟢 Anvil Sound and Visual Indicators in Minecraft
Anvils provide visual and sound feedback during use. These indicators help players recognize anvil condition and action results.
🟩 Sound Effects During Anvil Use
Using an anvil produces a metallic sound when actions are applied. Different sounds indicate successful operations or failed attempts.
🟩 Visual Damage Appearance
Anvils visually change as they become damaged. Cracks appear on the anvil model as it moves from undamaged to very damaged states.
🟩 Feedback During Failed Actions
When an action cannot be completed, the anvil interface shows the result slot as unavailable. This visual cue appears alongside blocked interaction.
🟢 Final Checklist Before Crafting and Using an Anvil in Minecraft
This checklist helps confirm that all requirements are met before crafting or interacting with an anvil.
🟩 Material Availability Check
Ensure that three iron blocks and four iron ingots are available in the inventory. Iron blocks must be crafted from iron ingots in advance.
🟩 Crafting Table Access
Confirm that a 3×3 crafting table is available. An anvil cannot be crafted using the 2×2 inventory grid.
🟩 Experience Level Readiness
Check that sufficient experience levels are available before using the anvil. Repairs, renaming, and combinations require experience to proceed.
🟢 Safety and Placement Precautions for Anvils in Minecraft
Anvils interact with gravity and entities in the world. Proper placement prevents accidental damage during gameplay.
🟩 Avoid Placing Anvils Above Players or Mobs
Anvils fall when unsupported and can damage entities below. Falling anvils deal damage on impact.
🟩 Use Solid Blocks for Support
Anvils must be placed on solid blocks to remain stationary. Transparent or non solid blocks do not prevent falling.
🟩 Be Careful When Stacking Anvils
Stacked anvils rely on block support. Removing the supporting block causes anvils above to fall immediately.
🟢 Anvil Use in Multiplayer Worlds
Anvils behave the same in multiplayer environments, but shared spaces and player interactions affect how they are used.
🟩 Shared Anvil Access
Any player can use an anvil placed in a shared area. Experience costs apply only to the player performing the action.
🟩 Ownership and Item Handling
Items placed in an anvil belong to the player using it. Other players cannot modify items inside the anvil interface at the same time.
🟩 Server Rules and Restrictions
Some servers apply limits to anvil use through settings or plugins. These rules may affect experience costs or allowed actions.
🟢 Anvil Replacement and Resource Planning in Minecraft
Anvils wear out over time and must be replaced. Planning resources in advance helps avoid interruptions during item management.
🟩 Knowing When to Replace an Anvil
An anvil progresses through damage states with use. A very damaged anvil has a higher chance to break during operations.
🟩 Preparing Iron for Replacement
Replacing an anvil requires the same materials as crafting a new one. Iron blocks and iron ingots must be prepared again.
🟩 Managing Multiple Anvils
Keeping more than one anvil in storage allows continued use if one breaks. This approach is common in long term worlds with frequent item upgrades.
🟢 Anvil Compatibility With Enchanted Books in Minecraft
Anvils interact directly with enchanted books during item upgrades. Understanding this interaction helps manage enchantments correctly.
🟩 Applying Enchanted Books to Items
Enchanted books can be applied to compatible tools, weapons, and armor using an anvil. The enchantment transfers from the book to the item.
🟩 Experience Cost When Using Enchanted Books
Applying an enchanted book consumes experience levels. The cost depends on the enchantment type and level.
🟩 Limitations With Enchanted Book Use
Only compatible enchantments can be applied to an item. Incompatible enchantments are blocked by the anvil interface.
🟢 Anvil Behavior After Breaking and Item Drops in Minecraft
Anvils do not always break the same way as other blocks. Their behavior depends on damage state and how they are destroyed.
🟩 Breaking an Anvil Manually
When an anvil is broken using a pickaxe, it usually drops as an item. The dropped anvil keeps its current damage state.
🟩 Breaking Due to Damage State
A very damaged anvil has a chance to break completely during use. When this happens, the anvil does not drop as an item.
🟩 Item Safety During Anvil Breakage
Items placed inside an anvil are not lost when it breaks. They return to the player’s inventory or drop nearby.
🟢 Quick Tips for Using an Anvil in Minecraft
These tips focus on correct usage and cost awareness when working with an anvil.
🟩 Experience Cost Awareness
Each anvil action requires experience levels. Repairing, renaming, and combining enchantments consume different amounts of experience.
🟩 Anvil Durability
Anvils have durability and can become damaged after repeated use. They may eventually break and need to be replaced.
🟩 Item Combination Order
The order in which items or books are combined affects the experience cost. Placing items in different slots can change the final cost.
🟢 FAQs
These common questions address frequent crafting doubts. Each answer is short, factual, and focused on anvil crafting.
🟩 How do you craft an anvil in Minecraft?
An anvil is crafted using three iron blocks and four iron ingots placed in a 3×3 crafting table.
🟩 How much iron is needed to craft an anvil on Minecraft?
Crafting one anvil requires a total of thirty one iron ingots.
🟩 Why can’t I craft an anvil in Minecraft?
An anvil will not craft if iron blocks are missing or items are placed incorrectly in the grid.
🟩 Can you craft an anvil without iron blocks in Minecraft?
An anvil cannot be crafted without iron blocks because they are required in the recipe.
🟩 What is an anvil mainly used for in Minecraft?
An anvils is used to repair items, rename items, and combine enchantments.
🟢 Conclusion
Crafting an anvil in Minecraft requires iron blocks and iron ingots placed correctly in a 3×3 crafting table. Preparing enough iron and following the exact recipe allows players to create an anvil without errors.
An anvil supports repairing, renaming, and combining items. It plays an important role in managing tools, armor, and enchantments as gameplay progresses.


One Comment